Experiencing the initial evaluation of the capacitive touch sensor using the latest 32-bit RX140 MCU

With ongoing enhancement of the HMI (Human Machine Interface) technology, sophisticated design and high operability has become a requirement to enhance the value of a product. Therefore, demand for the capacitive touch sensor is becoming higher, because it allows various materials such as wood and transparent acrylic to be adopted as an operation panel according to the concept of the housing design and can easily realizes high usability with LED lights as a user guide. However, even if you want to implement the capacitive touch sensor into your HMI, some may consider its evaluation as a high hurdle to overcome.
Renesas offers boards for the RX family MCUs such as the Renesas Solution Starter Kit (RSSK) and the Renesas Starter Kit (RSK) so that users can immediately evaluate the capacitive touch sensor. In this blog, Renesas will introduce how to make an initial evaluation of the capacitive touch sensor using the most inexpensive and basic board, the "Target Board" with a simple work to connect to the touch electrode.
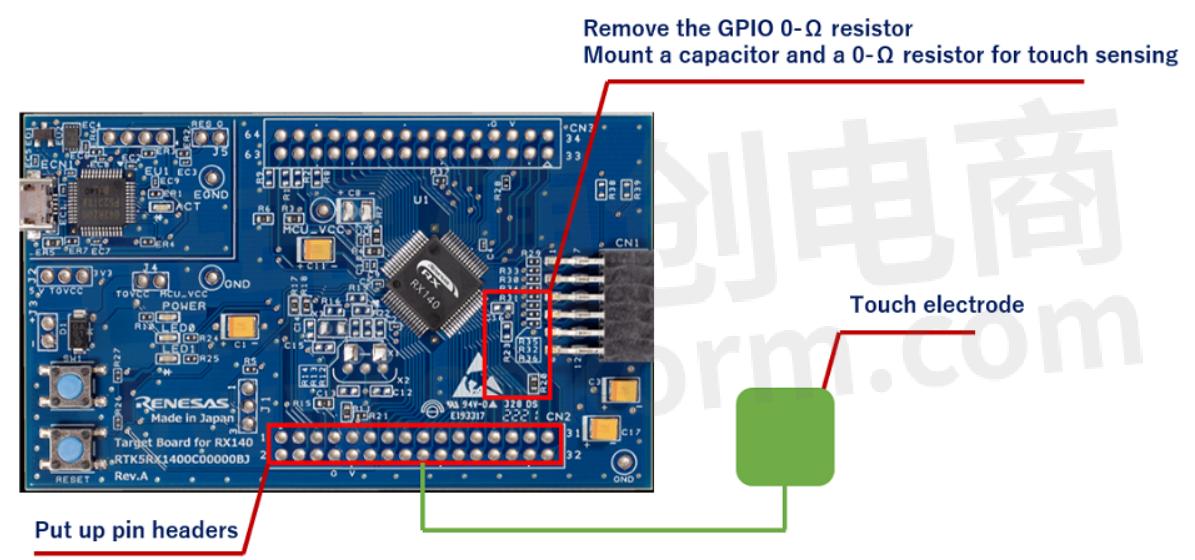
The Target Board is the most suitable evaluation board for initial deployment consideration, which provides access to all the MCU signal pins and is easy-to- purchase. The specification of the conventional Target Board did not allow to implement the LPF capacitors required for the touch operation, and the evaluation was difficult. In the "Target Board for RX140" that has the latest RX140 MCU, Renesas provides the patterns for cutting for LPF capacitor connection, making initial evaluation of the touch features possible.
At first, following the circuit schematics of this board and the user's manual, remove the GPIO 0-Ω resistor connected to the TSCAP pin on the RX140 MCU, and mount a capacitor and a 0-Ω resistor for touch sensing. Next, mount pin headers on the through holes on board to connect to the touch electrode. For design of electrodes, please refer to "CTSU Capacitive Touch Electrode Design Guide".

After the board is prepared, start Renesas Integrated Development Environment, e2 studio, and create a new project. When creating a project, you can easily set the MCU clock, pins, and peripheral functions and download the driver by checking "Use Smart Configurator". In addition, install a development support tool for capacitive touch sensing, QE for Capacitive Touch, as a plug-in, making it possible to generate a touch detection program automatically, monitoring measurement values, and adjusting parameters with GUI easily. For details on creating a program that uses the capacitive touch sensor, refer to the "Using QE and FIT to Develop Capacitive Touch Applications".
Writing the program to the RX140 MCU and start debugging, you can visually check the touch detection in the monitor window of the QE for Capacitive Touch in real-time.

- +1 Like
- Add to Favorites
Recommend
- Renesas 32-bit RX at the Closing of 10th Anniversary: RX roadmap continues to expand
- Renesas‘ RX Security Solutions Provide A Unique Hardware Technology, Implementing Robust IoT Security Easily
- Renesas RX Becomes World‘s First General-Purpose MCU to Obtain CMVP Level 3 Certification Under NIST FIPS 140-2
- Renesas DSP Solution on Renesas Lab on the Cloud, Input Analog Signals Directly From A Signal Generator To The Rx231 Microcontroller Evaluation Board
- The Past and the Future of Renesas RX Family Software
- Renesas Ships 1 Billionth Device From RX Family of 32-bit Microcontrollers
- Evolve Your HMI Effortlessly with Renesas RX Microcontrollers and Serial LCD
- Renesas RA and RX families of MCUs Offer a Comprehensive Ecosystem Enabling Users to Effortlessly Connect to Their Preferred Cloud Services
This document is provided by Sekorm Platform for VIP exclusive service. The copyright is owned by Sekorm. Without authorization, any medias, websites or individual are not allowed to reprint. When authorizing the reprint, the link of www.sekorm.com must be indicated.


