Get Started with Thunderboard™ Sense and Sense 2

Start collecting environmental and motion data easily. Thunderboard Sense kits support multiprotocol wireless connectivity including Bluetooth®, Thread, and Zigbee, and its sleek design is supported by free online analytics dashboard and open source mobile apps.
Setting up your Thunderboard Sense Kit
Requirements
Thunderboard Sense or Thunderboard Sense 2
Coin cell battery or Micro-USB cable (not included)
Android or iOS mobile phone
Useful Documents
Thunderboard Sense BLE Demo User's Guide (UG251)
Thunderboard Sense 2 BLE Demo User's Guide (UG313)
Unleash the power of Thunderboard Sense. Let's start with unboxing, downloading the app and exploring the sensors and basic features.
Note: Refer to the BLE Demo User's Guide for more detailed information on the Thunderboard Sense BLE demo
Step 1: Unbox Thunderboard Sense
Purchase a Thunderboard Sense 2 if you don't already have one.
Remove Thunderboard Sense from the box.
Supply power to your Thunderboard Sense: place a battery in the coin cell battery holder on the bottom of the board, or plug in a micro-USB cable.
Note: The air quality sensor and RGB LEDs requires external power. You will need to power the board via USB to test these.
Step 2: Use the Thunderboard Mobile App
Download the Thunderboard mobile app
Apple Store
Google Play
Enable Bluetooth on your mobile phone

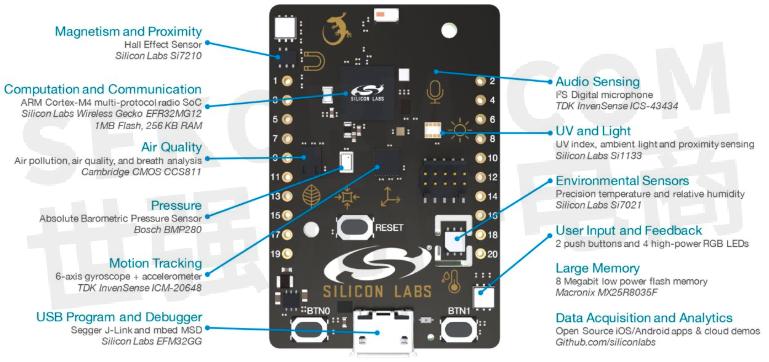
·Select the motion and calibrate the board and test the accelerometer and gyroscope.
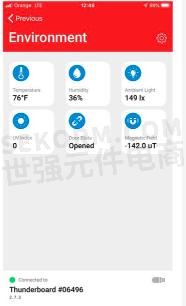
·Select "Environment" to test a number of environmental sensors
·Humidity and Temperature: Blow or cover the temp. sensor with your finger
·Light: Cover or shine a light on the board
·UV: Measure UV index from the sun or a UV light
·Sound: Talk, whistle, sing or clap to record audio levels
·Pressure: Move the board from floor to ceiling to test the barometric pressure sensor
·Magnetic Field and Door State: Move a magnet near the Hall Effect sensor and observe the effects
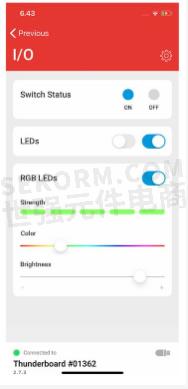
·Select "I/O" to test a buttons and LEDs.
·Switches: Press the two push buttons on the board
·LEDs: The app switches will turn on/off the small LEDs on the board
·RGB LEDs: Control the color and brightness of the RGB LEDs
Developing with your Thunderboard Sense Kit
Requirements
Thunderboard Sense or Thunderboard Sense 2
Micro-USB cable
Simplicity Studio
Bluetooth SDK
Useful Documents
Thunderboard Sense User Guide (UG250)
Thunderboard Sense Bluetooth Guide (UG251)
Thunderboard Sense 2 User Guide (UG309)
Thunderboard Sense 2 Bluetooth Guide (UG313)
Step 1: Get Simplicity Studio
Download Simplicity Studio and run the installer. If you already have Simplicity Studio installed, you can skip to Step 5.
Step 2: Connect to your computer
Connect the Thunderboard Sense to your computer using a micro-USB B cable. A blue LED should turn on next to the USB connector to verify connectivity.
Step 3: Install drivers
Follow the Installation Wizard so it can install the basic drivers.
Step 4: Log-in
By logging in, you will get access to the required wireless stacks and SDKs for Thunderboard Sense. You do not need to register your Thunderboard Sense at this time.
Step 5: Install the latest software
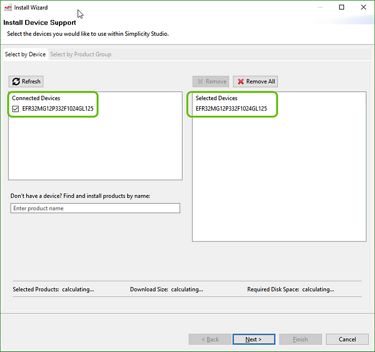
5a. If this is your first time to install Simplicity Studio, simply follow the Install Wizard recommendations based on the detected “Connected Devices”.
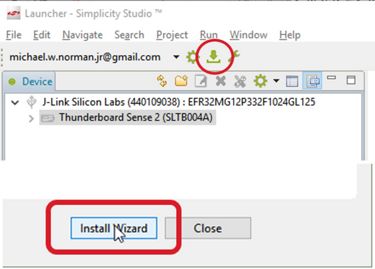
5b. If you already had Simplicity Studio installed, click on the “Update Software” button and choose the “Install Wizard” from the bottom of the dialog box.
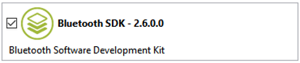
5c. Insure that latest version of the "Bluetooth SDK" (version 2.6 or later) is installed.
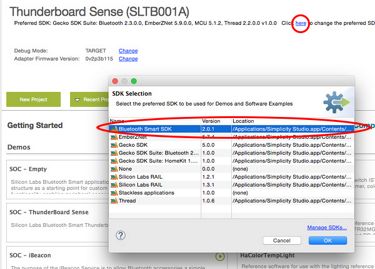
5d. In the Launcher window, click to change the preferred SDK, and choose the Gecko SDK Suite featuring the latest Bluetooth SDK.
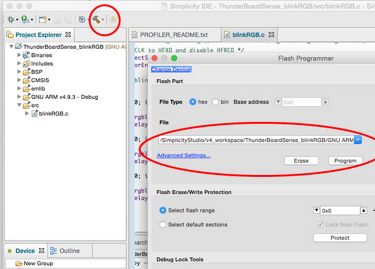
Step 6: Cloning a Project
In the Launcher perspective, with your Sense kit selected in the Devices window, select the desired project from the available “Software Examples”. This action will clone the pre-tested project. From here you can explore and modify and source code, compile, and debug.
- +1 Like
- Add to Favorites
Recommend
This document is provided by Sekorm Platform for VIP exclusive service. The copyright is owned by Sekorm. Without authorization, any medias, websites or individual are not allowed to reprint. When authorizing the reprint, the link of www.sekorm.com must be indicated.
Integrated Circuits


Discrete Components


Connectors & Structural Components


Assembly UnitModules & Accessories


Power Supplies & Power Modules


Electronic Materials


Instrumentation & Test Kit


Electrical Tools & Materials


Mechatronics


Processing & Customization


