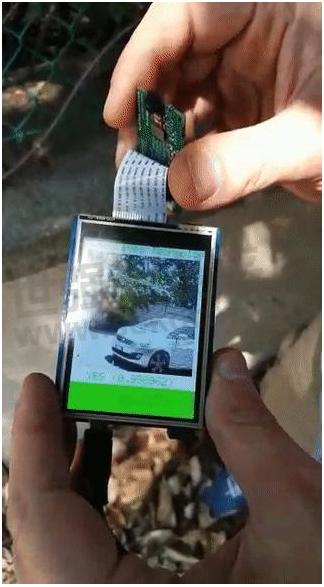
Building a battery-operated smart camera in five steps using a multi-core microcontroller

Power consumption is the major concern when designing a battery-operated camera system that interprets images on an edge sensor. GREENWAVES' GAP application processors enable new types of devices that combine ultra-low power consumption with sophisticated signal processing and neural network algorithms.
In this post, we demonstrate how to train and deploy a deep learning model for image recognition on GAP8—the first generation of ultra-low power IoT application processors. Thanks to the power-optimized MCU-class architecture tailored for intensive AI workloads, GAP8 is the perfect solution when coupled with low-power cameras.

A GAP8-based smart camera that leverages Convolutional Neural Networks MobilenetV2 can process image data while consuming less than 37.5 mW/FPS.
In this post, you will learn the necessary design steps to build a GAP8-based smart camera system from data to prototype in a few hours. After training and converting a model using the TensorFlow toolkit, the GAPflow toolset is exploited to bring trained models on the GAP8 chip.
You can also find more information in our NN Menu—GreenWaves’ repository, which contains common mobile and edge NN architecture examples, NN sample applications, and full flagged reference designs. Our tools map a TFLlite model (quantized or unquantized) onto Gap.

Overview
The design process consists of the following five steps:
1. Data Collection to feed the training process of the Convolutional Neural Network
2. Model Training
3. Graph Conversion to a format that can be fed to the GAPflow toolset
4. GAPflow to generate a GAP-optimized C code for inference
5. Deployment of the generated code on the board
Each step will be detailed based on the vehicle spotting use case.
Requirements
The DL model design relies on the open-source Tensorflow Slim (TF1.x) to train and convert the model (Steps 1–3). GAPflow, which is part of the GAP SDK, brings the DL model to the board (Steps 4–5).
Step 1: Build the Dataset
Training a neural network for vehicle spotting requires a large training dataset, including thousands of labeled image samples. Fortunately, a large number of samples can be freely downloaded from OpenImages by distilling the COCO dataset. Accordingly, TFSlim includes the script to build a custom dataset with the intended classes (foreground_class_of_interest):
python3 slim/download_and_convert.py --dataset_name=visualwakewords --dataset_dir=visualwakewords_vehicle --foreground_class_of_interest='bicycle','car','motorcycle','airplane','bus','train','truck','boat' --small_object_area_threshold=0.05 --download --coco_dir=/path/to/coco_dataset
The small_object_area_threshold specifies the minimum area (in percentage) of a target object to label a COCO image as “Object Spotted.”
Step 2: Train the Deep Learning Model (with Quantization)
The TFSlim package includes the train_image_classifier script to train custom image classifiers on a selected dataset (dataset_dir). The model architecture can be selected from a set of available models. In our project, we choose a MobileNetV2 model and we train it on 224×224 greyscale image crops (use_grayscale option) – training images are converted to greyscale before feeding the model.:
python3 train_image_classifier.py --train_dir='vww_vehicle_train_grayscale' --dataset_name='visualwakewords' --dataset_split_name=train --dataset_dir='./visualwakewords_vehicle/' --log_every_n_steps=100 --model_name='mobilenet_v2' --checkpoint_path='./vww_vehicle_train_grayscale/' --max_number_of_steps=100000 --num_clones=1 --quantize_delay=90000 --use_grayscale
A quantization aware-training process is applied to quantize the model to 8-bit. The quantization starts after 90,000 training steps (quantize_delay). A symmetric quantization rule, compliant with the GAP8 inference library, is imposed by setting contrib_quantize.experimental_create_training_graph_(symmetric=True)) (line 538 of the training script).
The accuracy of the trained model is assessed by evaluating it on the validation set:
python3 eval_image_classifier.py --checkpoint_path='vww_train_vehicle_grayscale/' --eval_dir='vww_eval_vehicle_grayscale/' --dataset_split_name=val --dataset_dir='visualwakewords_vehicle/' --dataset_name='visualwakewords' --model_name='mobilenet_v2' --quantize --use_grayscale
In case of vehicle spotting, a MobilenetV2 reaches 87% of classification accuracy with grayscale images and quantization, a percentage only 2% lower than that of the accuracy a quantized MobilenetV2_0.35 model reaches when trained on RGB images.
Step 3: Export and Convert the Quantized Inference Model to TFLite format
The trained model is exported and frozen before the conversion to TFlite format, again leveraging TFSlim scripts:
python3 slim/export_inference_graph.py --model_name=mobilenet_v2 --image_size=224 --output_file=./mobilenet_v2_224_grayscale.pb --quantize --use_grayscalefreeze_graph --input_graph=./mobilenet_v2_224_grayscale.pb --output_graph=./frozen_mbv2_224_grayscale.pb --input_checkpoint=./vww_train_vehicle_grayscale/model.ckpt-100000 --input_binary=true --output_node_names=MobilenetV2/Predictions/Reshape_1tflite_converter --graph_def=./frozen_mbv2_224_grayscale.pb --output_file=mbv2_grayscale.tflite --input_arrays=input --output_arrays=MobilenetV2/Predictions/Reshape_1 --inference_type=QUANTIZED_UINT8 --std_dev_val=128 --mean_val=128
Step 4: GAPflow
The GAPflow (please see figure below) is a toolset that converts a TFlite model into GAP-optimized C code to run inference on image sensor data. The script-based flow can be found here. Specifically, NNtool is invoked to convert the tflite file into an intermediate representation format—the AT model. This latter feeds the Autotiler tools, which are in charge of generating the final C code.
To perform these steps, the Makefile is configured to run the GAPflow operations.
make clean all [RGB=1]
RGB=1 needs to be configured in case an RGB sensor is available. Fast customization can be applied by changing the Makefile and the common.mk variables, which specify the location of the

Step 5: Get the Board and Run the Model
The generated inference code functions are called within the main application code to run inference on sensor data. You only need to connect the image sensor to the Gapuino board, and you can test your first smart camera module by running:
make run [RGB=1]
Conclusion
The GAP toolset enables AI at the very edge with seamless integration with major deep learning frameworks and provides a power-optimized solution that AI experts or embedded systems designers can use to enable new generation products.
- +1 Like
- Add to Favorites
Recommend
- GreenWaves Technologies Announced Availability of GAP8 Software Development Kit and GAPuino Development Board
- New GAP8 SDK V2.1 Was Released from GreenWaves Technologies
- Visual Wakewords on GREENWAVES GAP8
- Lynred and GreenWaves collaborate on New Occupancy Management Reference Platform for People Counting Sensor
- GAP8 SDK V3.0 Release from GreenWaves Technologies
- GreenWaves Technologies Unveils GAP8 IoT Application Processor, Enabling Groundbreaking Embedded Artificial Intelligence at the Very Edge
- GreenWaves Presented at Edge AI Summit in 18-20 November 2020
- GreenWaves Technologies Announces 7M€ Series A Funding with Huami, Soitec and other investors
This document is provided by Sekorm Platform for VIP exclusive service. The copyright is owned by Sekorm. Without authorization, any medias, websites or individual are not allowed to reprint. When authorizing the reprint, the link of www.sekorm.com must be indicated.


