Let’s Get Started with RX MCU Software Development! First Step Is to Start with e2 Studio!
For those of you who are going to use RX MCU at the office, laboratory, or club activity, and who are planning to use it, today, I will introduce our Renesas RX’s web page and what to download at the start of development. I have also tried installing the latest RX development environment. You need only 2 steps to get ready.
At first, please visit ‘RX Family Development Environment’. As shown in Figure 1, you will need to install the Integrated Development Environment (IDE) and compiler.
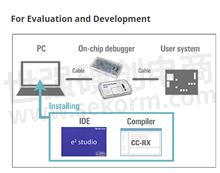
[Figure 1]
So let’s install it by following procedures. (Even if you don’t have a board yet, don’t worry. Installation, activation, and build are available.)
Step 1. Scroll down the page ‘RX Family Development Environment’ to Figure 2. Click “Latest version” of Integrated Development Environment (IDE), e2 studio (called e-square-studio), to download.
(You are requested to log in to My Renesas here. If you have not registered yet, please click ‘Register’ for registration.)

[Figure 2]
Step2. Unzip the downloaded file (Figure 3-1) and double-click on the .exe file (Figure 3-2) to install e2 studio.
You can also install free compilers by following the instructions.
![]()
[Figure 3-1]
![]()
[Figure 3-2]
That’s all!
The development environment is ready.
After activating e2 studio, the message ‘Welcome to e2 studio’ is displayed (Figure 4). Click [Create a new C/C++ project] to create a new project (a code generation function Smart Configurator or a standard installed driver (RDP) will support your software development!) or click [Import existing projects] to import a project such as a downloaded sample software from Renesas web page or a copied project from your senior at work/lab, then you can start the development.

[Figure 4]
As an example, I’m showing you how to import and change the sample code for ‘Target Board for RX231 LED Blink Control Program’, which is pre-installed on the RX231 target board.
Download ‘RX231 Group Target Board for RX231 LED Blink Control Program - Sample Code’ on the web page Target Board for RX231. And unzip the file. (You are requested to log in to My Renesas again.)
From here on, refer to ‘3.3 Import existing Projects into Workspace’ of ‘Integrated Development Environment e2 studio 2020-04, e2 studio v7.8 User’s Manual: Getting Started Guide’ (hereafter Getting Started Guide). Click [Import existing project] on the screen as Figure 4, then you can see the status as 3.3.4 of the Getting Started Guide shows. Follow the instructions of the Guide until 3.3.9 to complete importing.
This sample software is a program that turns LED0 and LED1 on and off alternately on the RX231 Target Board. Under the default settings, it operates like this: both LEDs are turned off → turn on LED1 → turn on LED0…. Let’s change it reversely like this: both LEDs are turned off → turn on LED0 → turn on LED1.

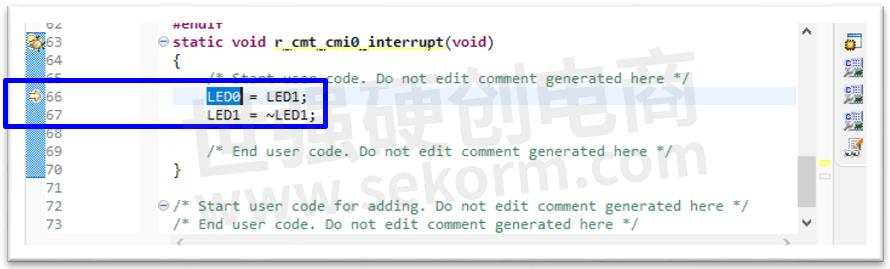
Change the line 66th and 67th of “r_cg_icu_user.c” and ”r_cg_cmt_user.c” as below.

Click [File]→[Save] to save the file.
Click the hammer icon just below [File] to build.
Image
![]()
If you have an RX231 Target board, please try to connect to the PC with USB cable and run the software.
It is longer than I expected. From here on, it is some extra information.
- +1 Like
- Add to Favorites
Recommend
This document is provided by Sekorm Platform for VIP exclusive service. The copyright is owned by Sekorm. Without authorization, any medias, websites or individual are not allowed to reprint. When authorizing the reprint, the link of www.sekorm.com must be indicated.
Integrated Circuits


Discrete Components


Connectors & Structural Components


Assembly UnitModules & Accessories


Power Supplies & Power Modules


Electronic Materials


Instrumentation & Test Kit


Electrical Tools & Materials


Mechatronics


Processing & Customization


