CRU software instruction

1 CRU Introduction
Compass Receiver Utility (CRU) is professional Windows-based configuration software developed by ComNav Technology. Using the CRU software, you can convert the original observation data (cnb) into Rinex format; configure the parameters of the static collection of the receiver (only the receiver of the K7 platform is supported, the receiver of the K8 platform needs to use webUI configuration); and you can view the satellites tracked by the receiver Status; download static data (only supported by some old models of T300 receivers).
1.1 CRU installation
Download and install CRU software from the link below (ensure the driver is properly installed in your PC):
https://www.comnavtech.com/companyfile/4/
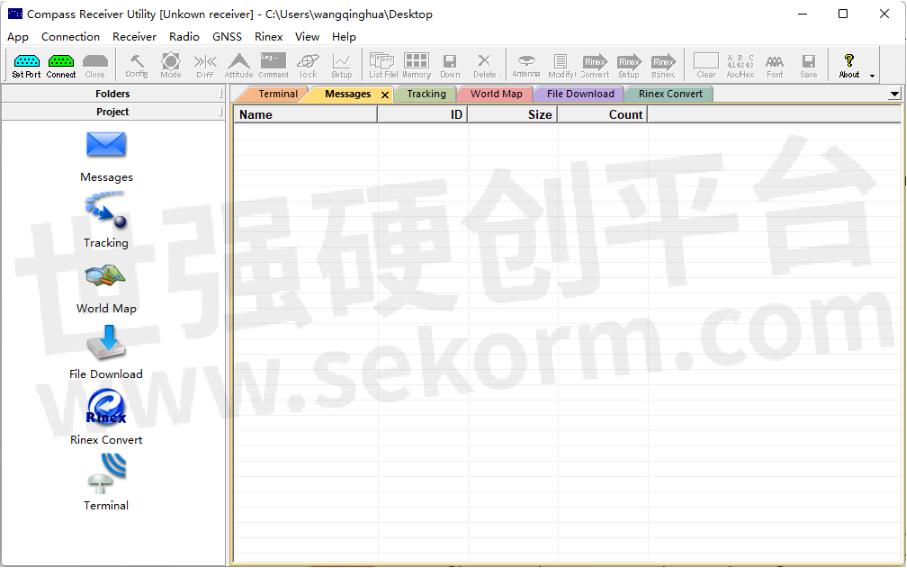
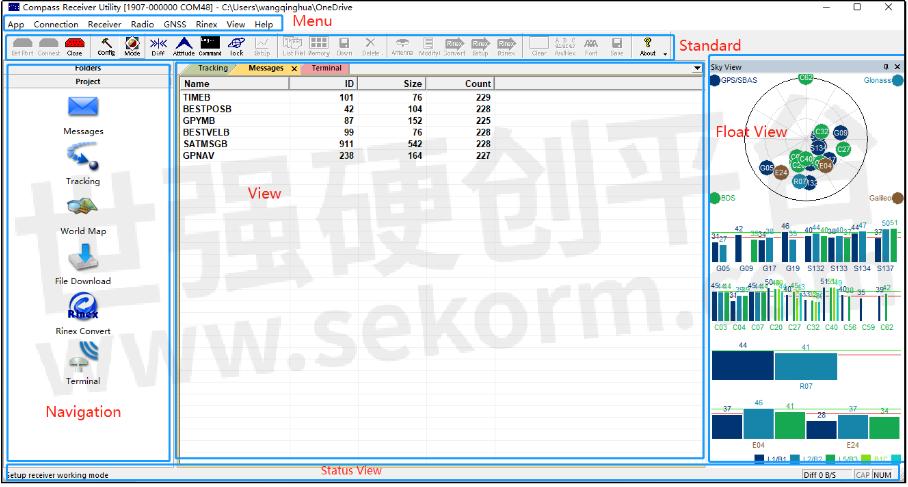
1.1 User Interface
This section describes the user interface and main menus of Compass Receiver software.
• Menu Bar: contains all functional menus.
• Standard Toolbar: quick access to the frequently used functions, including device connection, configuration, static data download, rinex convert, and data log.
• View Area: the main display window.
• Navigation Pane: you can browse the folders of your computer and check some main functions of CRU software.
• Float window: shows the information of sky View, PVT View, and Time View, go to menu Bar -> View to active float window.
• Status box: contains the display current cursor indication, differential data flow, etc.
1.2.1 Menu Bar & Standard Bar
The menu bar includes App, Connection, Receiver, Radio, GNSS, Rinex, View, and Help. The main functions of each menu are described below:
![]()
• App: Click to exit the CRU software.
• Connection: Support three connection methods: Serial port, TCP Client, Data file, connect and disconnect the OEM board, and setup differential corrections.
• Receiver: Include some receiver settings, like Attitude settings, Work mode, and Lock/Unlock.
• Radio: Including CDL3/CDL5 configuration settings and T300 radio work mode settings.
• GNSS: Display or disable the GPS/BDS/GLONASS/GALILEO constellations in the Sky View.
• Rinex: Rinex converts settings.
• View: Display or disable the floating views.
• Help: Help and about compass solution.
The Standard Bar includes Connection Settings, Receiver Settings, Static data download, Rinex convert, Datalog, and About.
The main functions of each Standard bar are described below:
![]()
• Connection Settings: Setport, connect and disconnect.
• Receiver settings: Static configuration, work mode, differential corrections setting, Attitude setting, Command, Satellite lock/unlock, and Setup.
• Receiver: Include some receiver settings, like Attitude settings, Work mode, and Lock/Unlock.
• Static data download: View static file list, read receiver memory, download static file, delete static file.
• Rinex settings: Antenna setup, antenna modify, rinex setup, rinex convert, binex convert.
Data log: Clear current message output in the view page, ASCII/HEX display switch, display font setting, and save the data log.
About: about compass solution.
1.3 Main function introduction
The following will mainly explain some common functions for OEM boards.
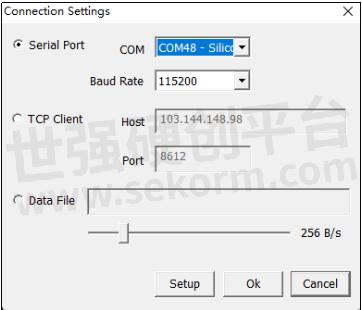
1.3.1 Connection setup
Connection setup supports three methods: Serial Port, TCP Client, and Data file reading, for the OEM board, select the Serial Port method.
Click Set port in the Standard bar or click Connection->Settings in the Menu bar, and you will go to Connection setup.
►Serial port: This is used to connect the com port of the receiver, you need to choose the proper baud rate (CRU supports 2400, 4800, 9600, 19200, 38400, 57600, 115200, 230400, 460800, 921600), click Setup->Connect or click OK directly to connect the OEM board, click Cancel to cancel Connection setup.
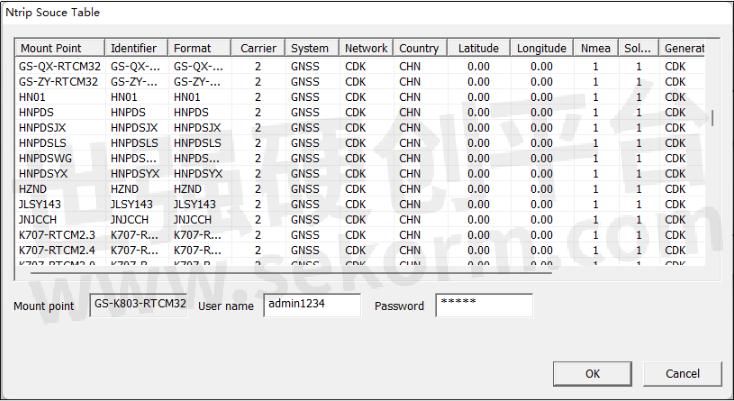
1.3.2 Differential source setup
RTK, send the carrier phase collected by the base station to the user receiver and calculate the coordinates by calculating the difference. RTK (Real-time differential positioning) is a measurement method that can obtain centimeter-level positioning accuracy in real-time in the field, and its appearance has greatly improved the efficiency of field operations.
Generally, the OEM board is the single status when it doesn’t receive differential corrections, if you want to set the OEM board as a rover and get differential corrections, you can click the Diff on the Standard Bar to set the Diff source.
►Diff: This is used to receive the differential corrections to do RTK, enter the Host IP and port, check on the Ntrip option, then click Connect to select one mount point.
Save RTCM: You can save RTCM data from the differential screams while doing RTK.

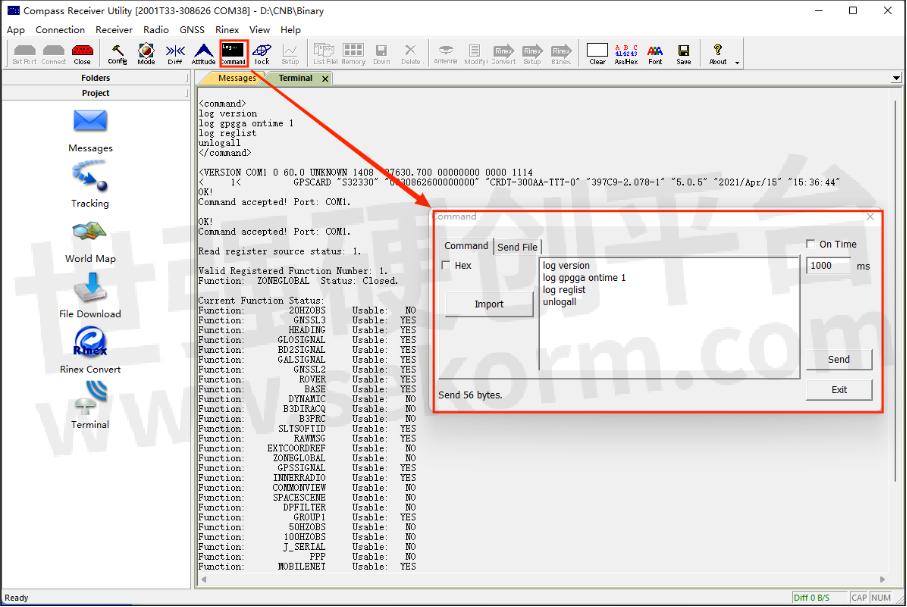
►Command: CRU software supports entering commands manually, you can create a command file (*.txt, or *.bin format), and click Import to import the command file, the commands will be listed in the Command view.
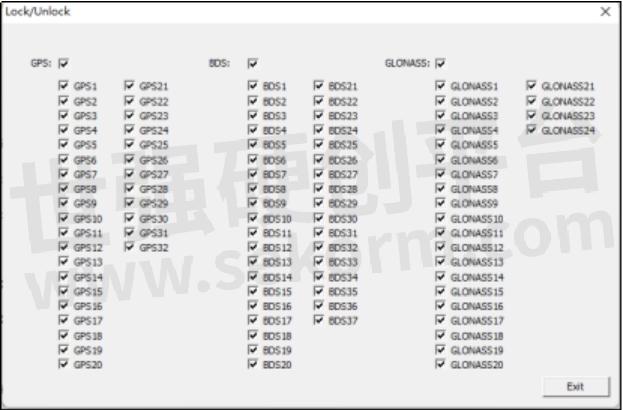
►Lock: When you open Sky View in the floating view, you will see all satellite constellations, you can disable or enable the whole satellite system or a specific satellite in Lock, and the corresponding satellites will show in Sky View.
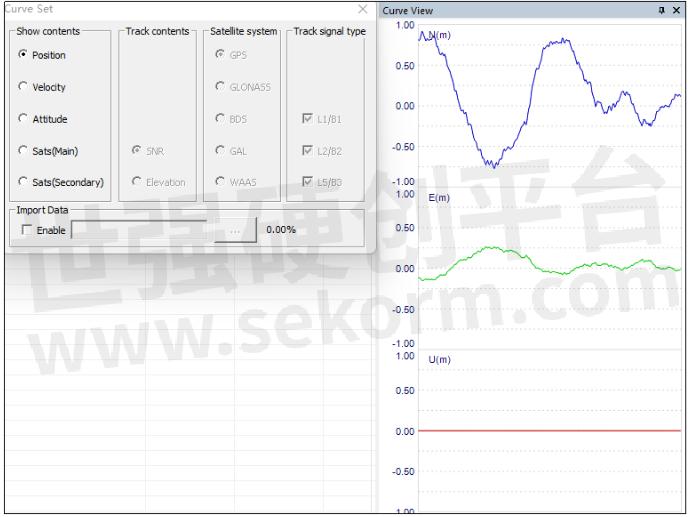
►Setup: Only Curve View is enabled, this setup will be highlighted and able to be configured, you can check the Position, Velocity, Altitude, satellite SNR and elevation.
1.3.3 Radio Settings
►CDL3/CLD5 settings: When CDL3/CDL5 is connected in CRU software, you can use the Radio setting to configure the parameters, click Read to get the current parameters, Click Default to restore to the default parameters, after changing the parameters, click Set to save the settings, the default setting is as below:

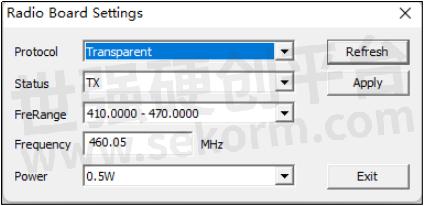
►T300: When the receiver (K7 platform) is connected, you can use this option to set up radio work mode.
Protocol: Supports Transparent, TT450S(Trimble), MAC (Medium Access Control), South Survey;
Status: TX/RX, TX means to transmit the correction, RX means to receive the corrections;
Frequency range: 410-470MHz, 865-867 MHz;
Power: 0.5w, 1.0w, 2.0w;
Refresh: Click Refresh to get the current radio work mode status;
Apply: After setup radio work mode, click Apply to save the settings.
1.3.4 Rinex Convert
CRU software supports converting CNB file to Rinex format, click Rinex Convert in the Navigation bar or in the Menu bar, and the Rinex part will be highlighted and able to set up.
![]()
1.3.4 Rinex Convert
CRU software supports converting CNB files to rinex format, click Rinex Convert in the Navigation bar or in the Menu bar, and the Rinex part will be highlighted and able to set up.
![]()
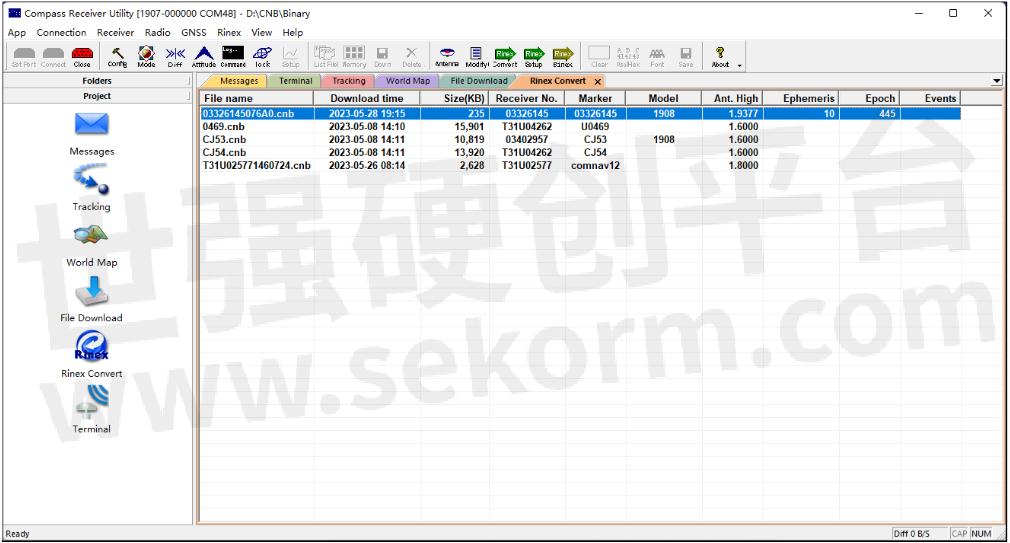
The Rinex convert steps are as below:
1. Click Folders to browse the static path;
2. Click Rinex Convert in the Project bar; select the cab file which needs to convert;
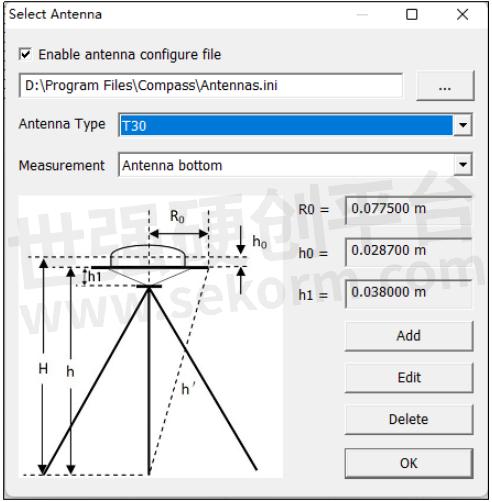
3. Click Antenna in the Standard bar, and set antenna type and measurement method; You can add antenna parameters if you don’t find the antenna you want.
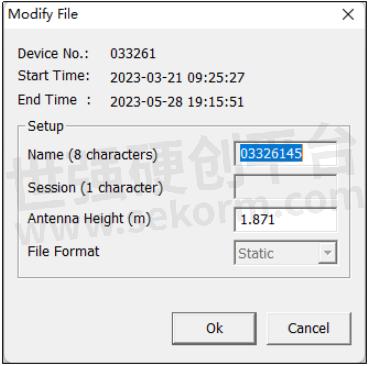
4. Click Modify in the Standard bar to set station name and antenna height;
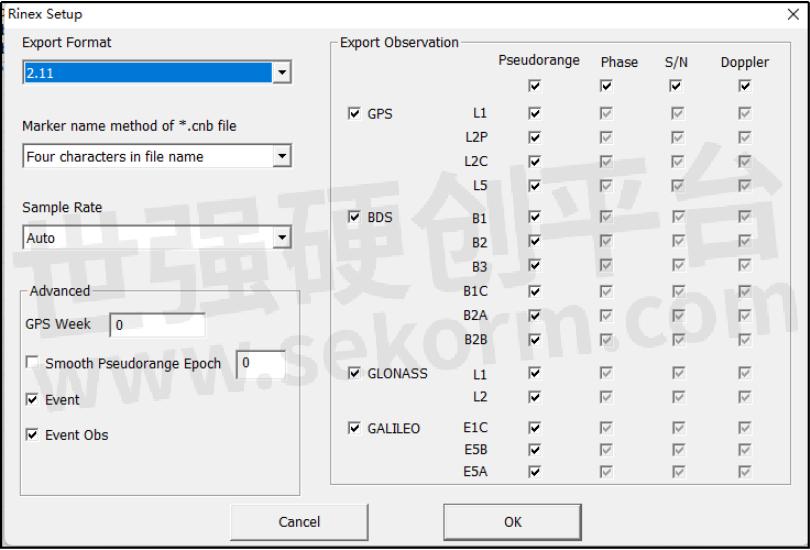
5. Click Rinex Setup in the Standard bar to choose Rinex parameters:
Rinex type: supports Rinex 2.01, 2.11, 3.01, 3.02, 3.03, 3.04.
Marker name method: Supports four characters in the file name, full file name, NMEA + Day (3 character) + Session (1 character)
Sample rate: Auto (default), 1 second, 5 seconds, 10 seconds, 15 seconds, 30 seconds, 60 seconds.
Event/Event Obs: If you convert PPK (dynamic files), you need to check on these two options.
6. Click Rinex Convert in the Standard bar to convert cnb file to a rinex file, the rinex files will be stored in the same path as the cnb file.
1.3.5 Project Bar
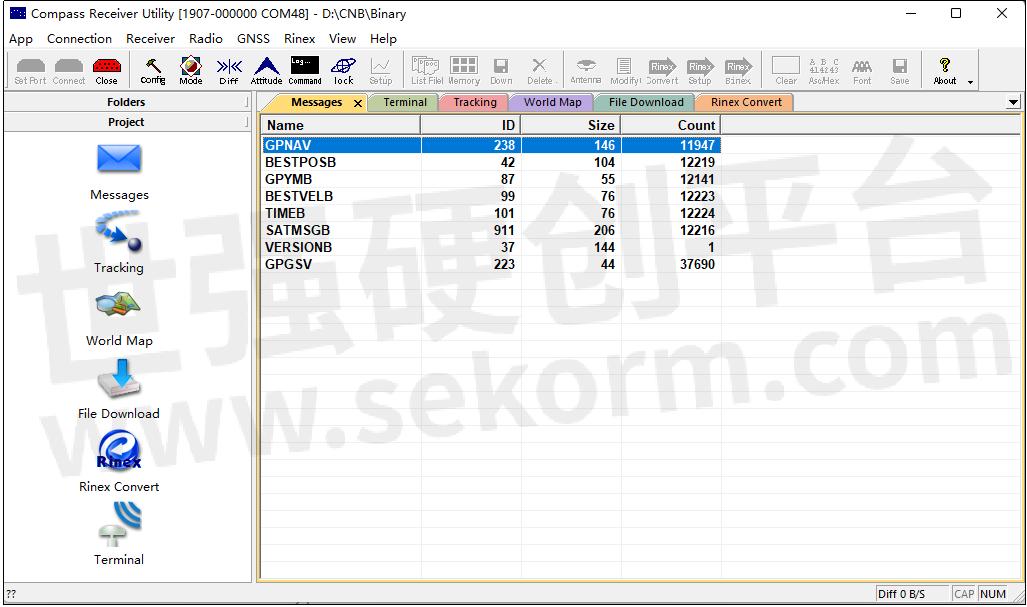
1.Messages
Click Messages to check current output messages of the receiver in the View area, if you send commands in Command, the corresponding messages will show in View area.
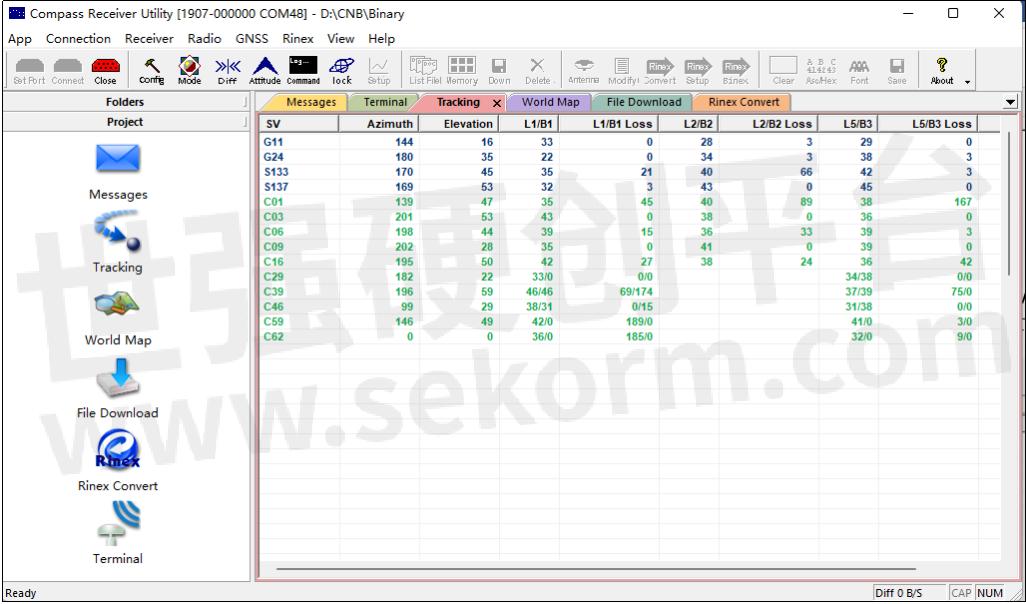
2. Tracking
Click Tracking to check current tracked satellite information, if you check Tracking view, when you go to the Terminal page, there will be some messages output in the View area, it is ephemeris in binary.
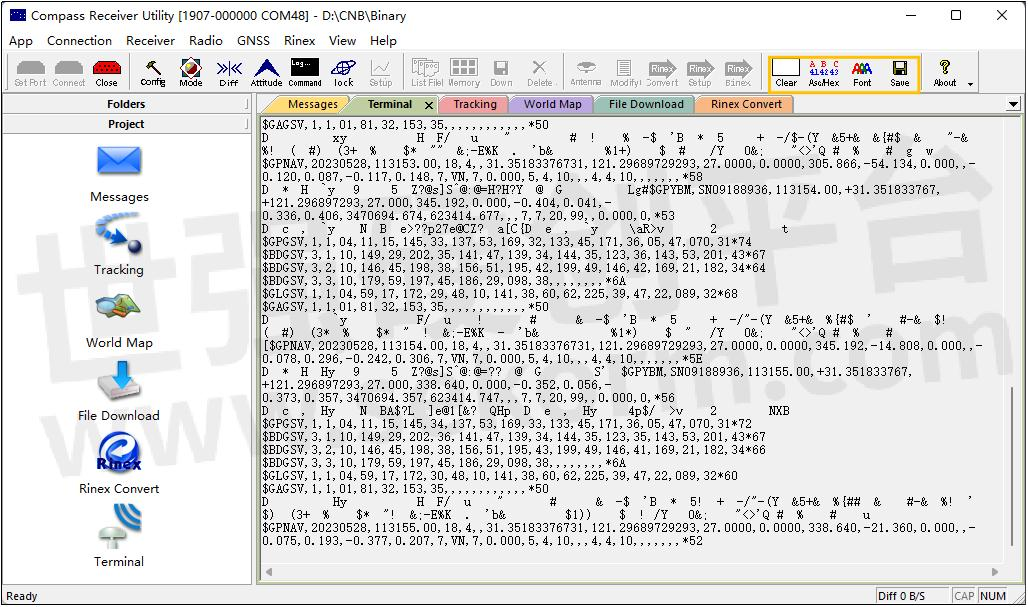
3. Terminal
Click Terminal to check current output message details, and the data log will be highlighted and able to be set up in the Standard bar.
• Clear: Clear all current output messages in the View bar;
• ASCII/HEX: Click to switch output messages between ASCII and HEX;
• Font: Change the display font of the output message;
• Save: Save a file about current output messages, when creating a file, the Save button will be highlighted, which means the file is saving, click the Save button again to stop the file saving.
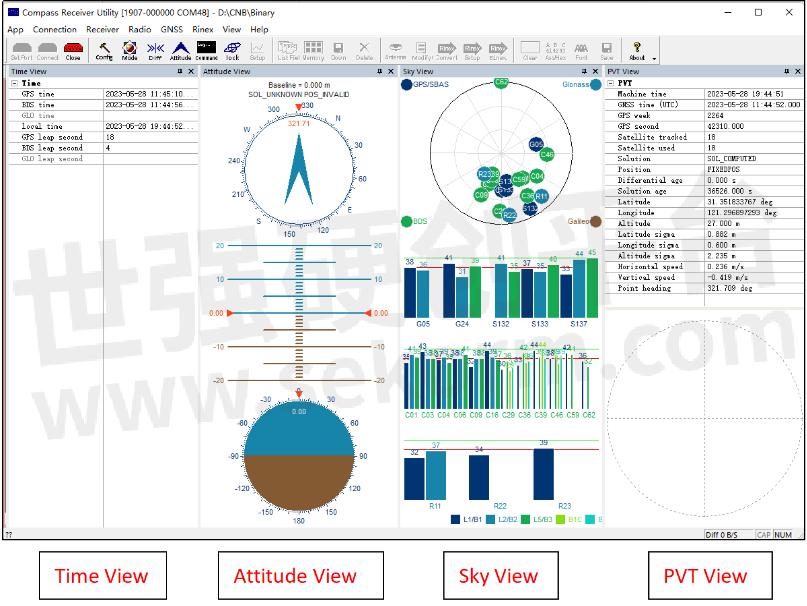
1.3.6 View
Click View in the Standard Bar to set up the float view, which includes Sky View, Attitude View, PVT View, Time View, Curve View, Sky View Secondary.
- +1 Like
- Add to Favorites
Recommend
This document is provided by Sekorm Platform for VIP exclusive service. The copyright is owned by Sekorm. Without authorization, any medias, websites or individual are not allowed to reprint. When authorizing the reprint, the link of www.sekorm.com must be indicated.
Integrated Circuits


Discrete Components


Connectors & Structural Components


Assembly UnitModules & Accessories


Power Supplies & Power Modules


Electronic Materials


Instrumentation & Test Kit


Electrical Tools & Materials


Mechatronics


Processing & Customization


